


By Lily, Master Crochet Designer
Let me tell you a highly embarrassing story about my early crafting days. My very first granny square blanket was an absolute, undeniable disaster. I decided to make a massive king-sized throw for my sister’s wedding. However, I did not understand how tension or stitch counts worked. As a result, every single square turned out to be a completely different size.
When I finally tried to sew them together, the blanket looked like a bumpy, wavy potato chip. I actually cried on my living room floor. Have you ever felt that deeply frustrated with your yarn? It is a terrible feeling. Because of this, many beginners abandon their beautiful, expensive yarn stashes in the back of a dark closet. They simply convince themselves that they lack natural talent.
Crocheting should relax your mind, not cause a mental breakdown. Fortunately, fixing your twisting squares is surprisingly simple. You just need a proper granny square pattern that clearly explains the hidden mechanics of the corners. Once you understand the basic mathematical formula, everything clicks into place instantly. Today, I am sharing my ultimate, comprehensive masterclass. We will cover the best materials, the biggest beginner mistakes, and eleven incredible designs to inspire your next masterpiece. Grab your favorite hook, and let us dive in.
Why Your Squares Turn Into Bowls (And How to Fix It)
If your square starts cupping like a soup bowl, you are probably making one extremely common mistake. Most beginners completely forget to add extra chain stitches at the corners. The stitches need physical room to bend around the ninety-degree angle. Without those chains, the fabric pulls tightly inwards.
On the other hand, if your square looks like a ruffled potato chip, you are adding too many stitches. You might be putting extra chains on the straight sides. The straight sides should remain tight and flat. Only the corners require extra breathing room.
Lily’s 3 Golden Rules for Perfectly Flat Squares:
- Count Your Clusters Relentlessly: A classic granny square uses groups of three double crochets (called clusters). Every single side of your square must have the exact same number of clusters. Check this math before you finish a row.
- Chain Two at Every Corner: Corners need massive space to stretch out. Therefore, always chain exactly two stitches when you reach a corner space. Do not skip this step!
- Flip Your Work Like a Pancake: Turn your square over after every single round. Working in the opposite direction stops your square from twisting sideways into a weird spiral shape. It keeps your seams perfectly straight.

The Ultimate Yarn and Hook Selection
You can theoretically use any scrap yarn you own. However, using the correct tools drastically speeds up your learning process. Fuzzy, highly textured yarn hides your stitches, making it impossible to see where your hook should go. If you cannot see the gaps between your clusters, you will inevitably drop stitches.
For your very first squares, you need crisp, smooth yarn. Personally, I absolutely love ordering premium bundles of DK weight cotton from LoveCrafts. They offer a massive shade range, allowing you to build gorgeous color palettes easily. Furthermore, their cotton blends do not split while you work.
My Trusted Hardware Kit:
- Ergonomic Hook: Grab a 5.0mm Clover Amour Hook. Cheap metal hooks cause severe wrist pain during long sessions. A soft silicone handle changes your crafting life completely.
- Blocking Mats: Foam Blocking Boards are mandatory. When you pin your wet squares to these foam mats, they dry into perfectly sharp, identical shapes. This makes sewing them together a breeze.
- Tapestry Needles: You need blunt steel needles to weave in those pesky yarn ends securely. Never cut your yarn too close to the knot!
8 Creative Fabrica Blanket Designs to Try Today
Once you conquer the basic flat square, the real creative magic begins. Did you know you can crochet entire animal faces right into the center of your blocks? I discovered these incredible digital charts on Creative Fabrica. Here are eight designs that will make your next blanket absolutely unforgettable.
1. Classic Crochet Blanket Pattern
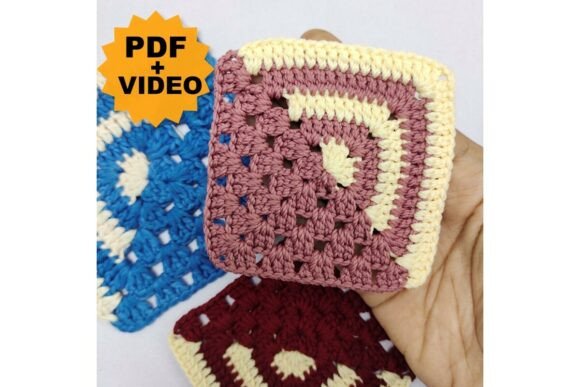
Start right here if you want a massive, traditional cozy throw. This comprehensive guide shows you exactly how to join dozens of colorful motifs together seamlessly. Consequently, you will never struggle with messy, crooked seams again. It is the perfect foundational pattern for anyone new to blanket making.
Lily’s Recommendation:
I highly suggest using this specific pattern as your master blueprint. It teaches you the exact math required to scale a baby blanket into a king-sized bedspread. For this classic look, I recommend buying a large value pack of acrylic yarn in complementary autumn shades: mustard yellow, burnt orange, and deep forest green. This guarantees a highly durable blanket that you can throw directly into the washing machine without fear of shrinking.
I highly suggest using this specific pattern as your master blueprint. It teaches you the exact math required to scale a baby blanket into a king-sized bedspread. For this classic look, I recommend buying a large value pack of acrylic yarn in complementary autumn shades: mustard yellow, burnt orange, and deep forest green. This guarantees a highly durable blanket that you can throw directly into the washing machine without fear of shrinking.
2. Woodland Animal Blanket Bundle
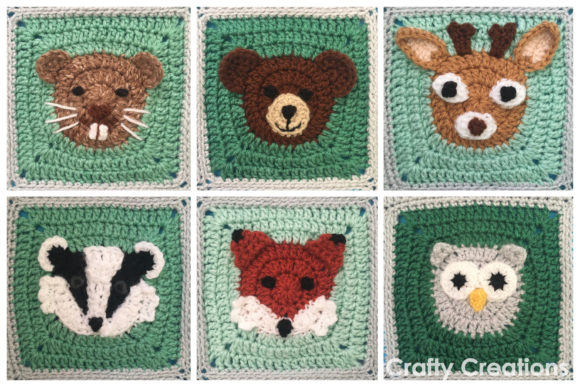
Why settle for plain blocks when you can crochet an entire forest? This massive bundle provides detailed charts for incorporating foxes, bears, and raccoons into your blanket panels. It combines intermediate color-work with beautiful structural framing, creating an heirloom-quality piece.
Lily’s Recommendation:
This comprehensive bundle offers incredible value for ambitious crafters planning a nursery gift. I highly advise reading through the entire PDF before buying your yarn. Because it uses multiple colors simultaneously for the animal faces, it is best to organize your yarn into small, manageable bobbins. Use plastic clothespins to keep your yarn tails separated. This simple trick prevents a massive tangled mess while you work.
This comprehensive bundle offers incredible value for ambitious crafters planning a nursery gift. I highly advise reading through the entire PDF before buying your yarn. Because it uses multiple colors simultaneously for the animal faces, it is best to organize your yarn into small, manageable bobbins. Use plastic clothespins to keep your yarn tails separated. This simple trick prevents a massive tangled mess while you work.
3. Rabbit Amigurumi Square
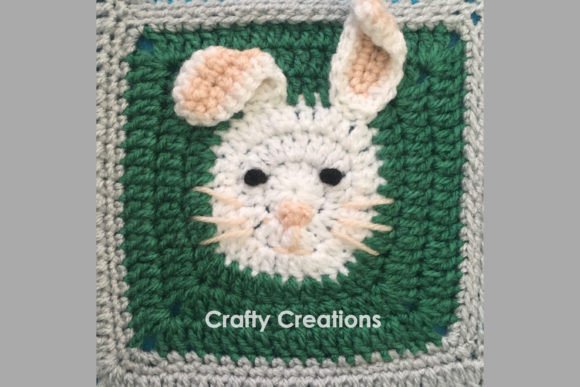
Look at those adorable floppy ears! This charming design places a cute bunny face directly in the middle of your square block. The ears are slightly raised off the fabric, providing a wonderful 3D texture that babies love to grab and hold.
Lily’s Recommendation:
This is absolutely fantastic for making spring or Easter-themed nursery blankets. I recommend making four rabbit squares, and alternating them with solid pastel-colored squares (like pale yellow and mint green) in a checkerboard pattern. Use a soft cotton-bamboo blend so the blanket stays cool during warm spring months. Do not forget to embroider the nose tightly so small children cannot pull it loose!
This is absolutely fantastic for making spring or Easter-themed nursery blankets. I recommend making four rabbit squares, and alternating them with solid pastel-colored squares (like pale yellow and mint green) in a checkerboard pattern. Use a soft cotton-bamboo blend so the blanket stays cool during warm spring months. Do not forget to embroider the nose tightly so small children cannot pull it loose!
4. Fox Woodland Square
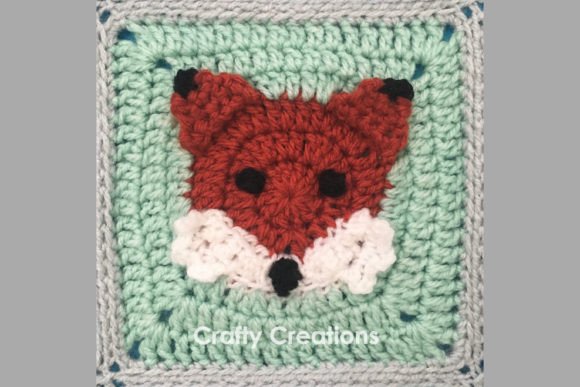
This clever chart creates a sharply pointed fox snout using brilliant color-blocking techniques. It uses bright orange and pure white yarn to build striking contrast. Honestly, combining this fox with dark green solid blocks creates a stunning forest theme immediately.
Lily’s Recommendation:
This square is a fantastic stash-buster. The fox face requires very little yardage, meaning you can easily use up those small, annoying balls of orange and black yarn you have hoarded for years. I suggest framing the fox with a dark navy blue border. The dark border will make the bright orange face pop intensely, giving your blanket a very modern, graphic look.
This square is a fantastic stash-buster. The fox face requires very little yardage, meaning you can easily use up those small, annoying balls of orange and black yarn you have hoarded for years. I suggest framing the fox with a dark navy blue border. The dark border will make the bright orange face pop intensely, giving your blanket a very modern, graphic look.
5. Magical Unicorn Square
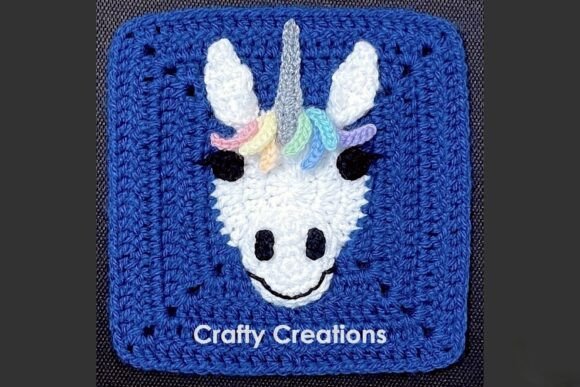
If you have a child who loves magical creatures, you must grab this layout immediately. It features a colorful striped mane and a prominent golden horn. Kids absolutely go crazy when they see this beautiful design resting on their beds.
Lily’s Recommendation:
This is a brilliant opportunity to use metallic or sparkly yarn! I highly recommend finding a yellow yarn laced with a thin metallic thread specifically for the unicorn horn. Furthermore, you can use highly variegated (rainbow) yarn for the mane. This saves you from constantly switching colors, while still delivering that magical, multi-colored rainbow aesthetic that kids adore.
This is a brilliant opportunity to use metallic or sparkly yarn! I highly recommend finding a yellow yarn laced with a thin metallic thread specifically for the unicorn horn. Furthermore, you can use highly variegated (rainbow) yarn for the mane. This saves you from constantly switching colors, while still delivering that magical, multi-colored rainbow aesthetic that kids adore.
6. Polar Bear Winter Square
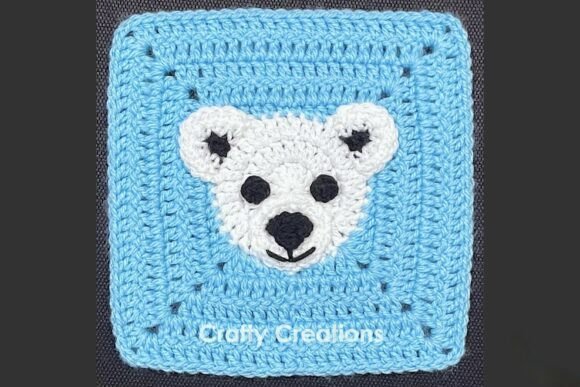
This brilliant pattern plays heavily with material textures. By using fluffy, textured white yarn specifically for the bear face, it adds incredible 3D dimension to your work. Make a few of these for a cozy, thick winter-themed reading throw.
Lily’s Recommendation:
When crocheting the bear face, use a bulky faux-fur or boucle yarn. Working with fluffy yarn is notoriously difficult because you cannot see the stitches. However, since the face is just a simple circle in the center, you can feel your way around the stitches easily. Pair this fluffy white face with an icy blue border to create the ultimate winter wonderland blanket.
When crocheting the bear face, use a bulky faux-fur or boucle yarn. Working with fluffy yarn is notoriously difficult because you cannot see the stitches. However, since the face is just a simple circle in the center, you can feel your way around the stitches easily. Pair this fluffy white face with an icy blue border to create the ultimate winter wonderland blanket.
7. Jellyfish Ocean Block
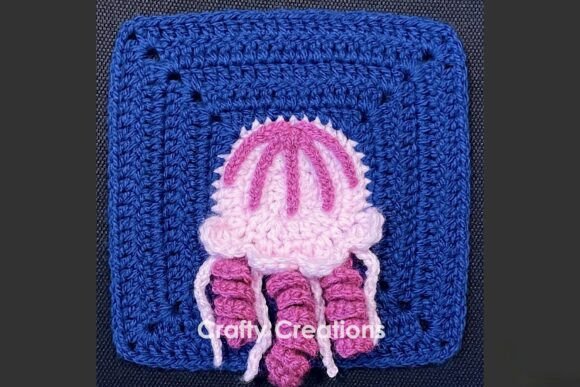
Planning a beach-themed bedroom? This mesmerizing jellyfish design includes tiny hanging tentacles that bring the static fabric to life. It perfectly utilizes soft pastel blues and pinks to create a deeply calming oceanic vibe.
Lily’s Recommendation:
Instead of a massive blanket, I highly recommend using this square to construct a fun beach tote bag! You only need thirteen squares to make a fantastic, sturdy market bag. The jellyfish tentacles hanging on the side of a beach bag look incredibly stylish and unique. Use a strong, non-stretching 100% mercerized cotton for bag projects.
Instead of a massive blanket, I highly recommend using this square to construct a fun beach tote bag! You only need thirteen squares to make a fantastic, sturdy market bag. The jellyfish tentacles hanging on the side of a beach bag look incredibly stylish and unique. Use a strong, non-stretching 100% mercerized cotton for bag projects.
8. Cute Mouse Block
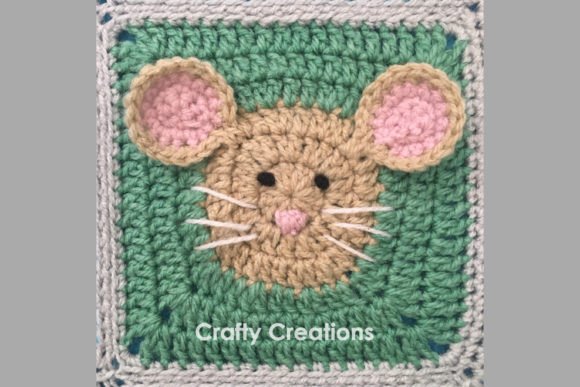
This tiny mouse features oversized round ears that pop out from the main fabric perfectly. It is a fantastic stash-buster project because it requires very little grey yarn to complete the central face.
Lily’s Recommendation:
This pattern works beautifully for small, quick gifts. If you do not want to commit to a massive blanket, try making just two of these mouse squares. Sew them together, leave the top open, and you instantly have a cute, handmade pouch for your sunglasses or crochet hooks. Line the inside with a simple piece of fabric to prevent hooks from poking through the holes.
This pattern works beautifully for small, quick gifts. If you do not want to commit to a massive blanket, try making just two of these mouse squares. Sew them together, leave the top open, and you instantly have a cute, handmade pouch for your sunglasses or crochet hooks. Line the inside with a simple piece of fabric to prevent hooks from poking through the holes.

Wear Your Squares: 3 Premium Garment Patterns
Who says squares are only meant for blankets? Once you master tension and blocking, you can easily sew squares together to create stunning, high-fashion clothing. I highly recommend purchasing premium garment patterns from LoveCrafts. Their designers include extensive sizing charts, ensuring your handmade sweater actually fits your body perfectly. Here are three magnificent wearable patterns.
9. Granny Square Tank Tops in Stylecraft

Bring a burst of vibrant color and beautiful boho charm directly to your summer wardrobe. This delightful duo of tank top designs relies on a grid of perfectly sized squares. Because it uses DK weight yarn, the fabric remains breathable during hot July afternoons.
Lily’s Recommendation:
Garments require precise measurements. I strongly recommend taking your bust measurements carefully before starting this pattern. The beauty of this design is its modular nature. If you need a longer top, simply crochet an extra row of squares at the bottom hem! Use a high-quality cotton blend to ensure the top drapes elegantly over your curves without feeling stiff or boxy.
Garments require precise measurements. I strongly recommend taking your bust measurements carefully before starting this pattern. The beauty of this design is its modular nature. If you need a longer top, simply crochet an extra row of squares at the bottom hem! Use a high-quality cotton blend to ensure the top drapes elegantly over your curves without feeling stiff or boxy.
10. Lace Up Granny Sweater

This is a brilliant modern twist on the classic stripe. Instead of full blocks, it utilizes the iconic granny stitch cluster to build an incredibly cozy, oversized sweater. The charming lace-up detail at the neckline elevates the design into high fashion.
Lily’s Recommendation:
This is the ultimate autumn staple piece. Because the granny stitch creates natural gaps, you must wear a camisole underneath. I highly recommend purchasing a luxurious, soft merino wool from LoveCrafts for this sweater. Cheap acrylic will cause you to sweat uncomfortably. A wool blend regulates your body temperature perfectly, keeping you warm without trapping heat.
This is the ultimate autumn staple piece. Because the granny stitch creates natural gaps, you must wear a camisole underneath. I highly recommend purchasing a luxurious, soft merino wool from LoveCrafts for this sweater. Cheap acrylic will cause you to sweat uncomfortably. A wool blend regulates your body temperature perfectly, keeping you warm without trapping heat.
11. Liv Granny Square Adults Top

This exquisite summer top is incredibly fun to make and extraordinarily comfortable to wear. It features intricate, lacy square motifs that form an elegant bustline. The pattern includes highly detailed descriptions and links to helpful photos, making it surprisingly accessible for ambitious beginners.
Lily’s Recommendation:
If you want to crochet your own wedding rehearsal top, this is the one! Use a pure white, mercerized cotton yarn. Mercerized cotton has a slight, beautiful sheen that looks incredibly elegant in photographs. Be incredibly patient when joining the motifs at the shoulder straps. A messy join on the shoulder will irritate your skin all day long.
If you want to crochet your own wedding rehearsal top, this is the one! Use a pure white, mercerized cotton yarn. Mercerized cotton has a slight, beautiful sheen that looks incredibly elegant in photographs. Be incredibly patient when joining the motifs at the shoulder straps. A messy join on the shoulder will irritate your skin all day long.
The Expert Guide to Assembling Your Squares
After crocheting fifty tiny blocks, you face the final, terrifying boss: assembly. Many people completely ruin their beautiful blankets by sewing the pieces too tightly. Consequently, the blanket loses its beautiful drape and becomes stiff. Here are my four favorite methods for flawless assembly.
1. The Invisible Mattress Stitch
If you want a fast, completely invisible seam, use the Mattress Stitch. You simply thread your yarn needle and weave back and forth through the back loops only. This method forces the seam to hide completely inside the fabric. Your squares will look like they magically melted together.
2. The Quick Slip Stitch Join
If you hate using needles, grab your crochet hook. Hold two squares face-to-face, insert your hook through both top loops, and slip stitch across. This creates a slightly raised ridge on the back of the blanket, but it is incredibly fast and highly secure.
3. The Join-As-You-Go (JAYG) Method
This brilliant technique is an absolute game-changer. Instead of sewing at the very end, you connect the squares using your crochet hook during the final round of the border. Thus, you weave in far fewer ends, and you skip the sewing phase entirely!
Mandatory Step: Wet Blocking
Never sew unblocked squares together. They will be slightly different sizes, and your blanket will buckle. Pin every single wet square onto a foam blocking board, stretching them slightly to form a perfect 90-degree corner. Let them dry completely overnight.
When you unpin them the next morning, they will remain sharply square forever. This crucial step elevates your work from “amateur craft” to professional boutique quality instantly.
Do Not Give Up On Row Two
Honestly, the second round of any square always looks incredibly messy. When you finish your first cluster, the whole shape seems hopelessly wrong and circular. Do not panic. Just keep crocheting through the ugly phase.
By row four, the square magically flattens out. Pour some tea, put on your favorite podcast, and trust the process. You are doing a spectacular job!

Written by Lily
Master Crochet Designer
I teach beginners how to overcome extreme crafting frustration. I focus on comprehensive weekend projects, step-by-step masterclasses, and building serious creative confidence. You deserve to make beautiful, complex things effortlessly without deciphering confusing technical jargon.
Affiliate Disclosure: This post contains affiliate links to Amazon, LoveCrafts, and Creative Fabrica. If you click through and make a purchase, I may receive a small commission at no extra cost to you. I only recommend premium tools, digital charts, and quality yarn I genuinely trust and use daily in my own busy craft room.

